1. This site uses cookies. By continuing to use this site, you are agreeing to our use of cookies. Learn More.
  2. Hey please check out our new forum Suggestions and Ideas found in the area "The Bay" - as we love all your ideas and want to collect them in one place, - please use it going forward. :) Thanks already for helping to make Battle Bay an even better experience. Remember: If your idea already exists - simply add your comment or like to an existing one so we avoid duplicates.
    Dismiss Notice

Event The Art of the Crosssfire: How to create localized 1v'n' scenarios... And get out of them

Discussion in 'Strategy Discussion' started by TheAntiSnipe, 16 Sep 2019.

  1. TheAntiSnipe

    TheAntiSnipe Moon's haunted

    Joined:
    11 Jun 2017
    Messages:
    9,118
    Location:
    Classified top secret ;-)
    Good day to everyone reading this, it's been a while since I wrote a strat thread... And because of certain people stalking me across chat platforms (*cough* @Nikkie! *cough*), I decided to rush this one just a wee bit ;)

    I think everyone here has fallen victim to a crossfire at least once. It's the kind of situation where you get targeted by enemies in such a manner that you have to swivel your turret 180 degrees to get a shot off on either of them. Normally, for almost ANY boat out there, a crossfire is a FATAL occurrence. Basically, a crossfire-type formation looks something like:
    upload_2019-9-16_15-45-54.png

    In battle, knowing how to lure the enemy into a crossfire-type formation is one of the easiest ways to score a kill, if your teammates can ACTUALLY SHOOT, of course :D

    There's two types of crossfire tactics:
    • Organized (When you're with a teammate)
    • Unorganized (When you're with randoms)
    Now, let's talk about the terminology I'm going to be using here:
    1. Luring/kiting - When you either lure the opponent in by being downright annoying, OR by being a low HP player, OR by making them think there's no risk in following you into a certain area.
    2. Firing cone - The portion of the battlefield that your opponent can realistically "snapshot" through. Think of it like this:
    upload_2019-9-16_15-55-5.png
    (Forgive my poor Paint skills lolol :D)

    Now, let's begin!

    1. The organized crossfire :-
    This strat is usually used by the famous "twin yellowboat hit team" squads for the most part, but damn near any combo of ships can execute it. The process itself is rather easy: One person takes one side of the opponent, with the teammate taking the other, and then they start the "Circle of Death". Here's a horrible Paint diagram:
    upload_2019-9-16_16-2-52.png
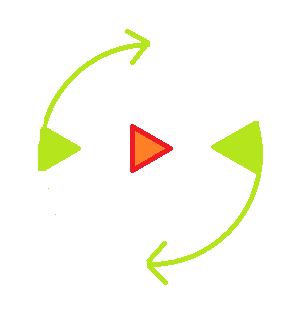
    As you can see, the Circle of Death relies on two major factors:
    1. The survival of both teammates.
    2. Positioning that ensures that the opponent cannot break out of it.
    While these two things do come with practice, it is the initiation of this Circle that poses quite a few problems.
    The main problem is, "How do we get the opponent in such a position that we can maintain a circle of death on them?"
    -->>The answer: Well, you kite them, in such a way that they get into a position where they cannot be assisted by their respective teams. There's quite a few types of kites to choose from, from the low-HP kite, to the annoying-guy kite. Choose wisely!
    The next one is, "When do we disengage from it?"
    -->> As I said before, since this is an organized kite, you and your teammate get to decide that. How skilled are you? What is the state of the enemy team? Usually, even if you're a pro at this, it's time to break the circle if the following things occur:
    1. The enemy team gets into such a position that two or more of them (INCLUDING the guy you're wailing on) can shoot at at least one of the two fleetmates.
    2. The opponent lays an amount of mines that makes traversal in the circle impossible / infeasible.
    The last question is, "What variations can we use?"
    -->> The methods you can use are only limited by your skill (and your fleetmates'!), I've seen some crazy stuff. Like that time when a carro speeder fleeted up with a frost user to completely NUKE the enemy shooter. If the frost user would miss, the carro speeder would close in and eat the friendly torp.

    2. The unorganized crossfire :-
    While fleetmates are always good to have around, there's always time when you end up going solo. For these cases, you have to find a way to lure the enemy into a crossfire that they cannot POSSIBLY see coming. There's many ways to do so. Tunnel plays are definitely the most reliable, however. Let's talk about those.
    upload_2019-9-16_16-23-15.png
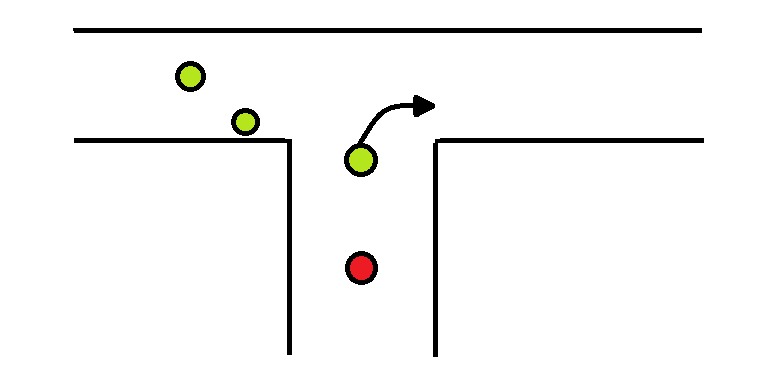
    This is the generic setup for a "tunnel play". Your team is rolling into the tunnel, completely out of enemy vision for the most part. You're bringing an enemy with you as you move towards the side of the tunnel that your teammates are NOT on. This results in this:
    upload_2019-9-16_16-31-13.png
    Yeah, that guy is gonna get completely COOKED before his team can come over and assist him. Mainly because of those arcs I've drawn. You see, anything that's white in the lower entrance? That's a position that your team CANNOT be targeted from. So IF they decide to come in the STRAIGHT way, the first guy in is going to be in a miserable 1 v 3 the moment he/she enters the tunnel. And if they decide to FLANK, well, it leaves your team with plenty of time to KILL their teammate AND change positions.
    Note:- This is, of course, the most basic type of crossfire, and it's situational as well. I encourage any reader of this thread to devise their own. I think the basic idea was clear enough, right?​
    Now that I'm done talking about crossfires, let's move on to how you can walk out of one, or better yet, avoid one.

    • Always keep one eye on how many enemies are alive, and how many you can see on radar. This will help you understand that you are being kited.
    • Don't try to "chase butterflies" (butterflies = enemies with good evasion that are clearly running from you). You'll waste shots, and if they're good, they're almost DEFINITELY luring you into a trap.
    • In the beginning of the match, take note of the people that are fleeted. Breaking apart fleets is the best way of securing the game, and nullifying any attempts at an organized crossfire.
    • Also, if you're an assassin, do NOT chase low HP enemies right at the start of the match if you know that they are the devious type. Because the start of the game is the BEST opportunity to initiate a crossfire, especially on maps like Foundry, Chillzone and Crude Awakenings, to name a few.
    • When getting out of a crossfire, a proficient person will try to RETURN THE FAVOR. If you're a speeder, you can initiate a low HP kite and turn the tables from the outside. If you're a trapper shooter, you can create a bottleneck as you escape, forcing the bigger mass of enemies to come into the firing cones of YOUR team. As a defender, you can slowly back out, using wave manipulation if possible. There's tons of methods to get out of a crossfire under the sun. Make sure you use them all well!
    Well, that's it for today, have fun setting up crossfires! Anti out!

    (Edit: Fixed a visual error with the last two diagrams)
     
    Last edited: 19 Sep 2019

Share This Page